
Guidelines for WDIM Notecard Research
(Or, how you’ll research, keep track of all the information you gather, and how you’ll organize it into a useful outline)
Why is notecard research worthwhile?
Using notecard research will make your papers easier to write:
Your notecards are the building blocks for creating your outline, and your outline is the data map that will be used to create a dynamic product for the Academic Exhibition. As you move closer to the creation phase of your project the notecards will enable you to organize your data in a logical order (the outline), and the outline will enable you to synthesize your findings. This synthesis is a crucial step in the creation of your final product.
Using notecard research will actually make researching easier:
This is because you have a system for organizing every note you and your group take. Each piece of information you write down becomes accessible and easy to trace. All group members can do research simultaneously. There is accountability, because each group member will initial each notecard they create, and will have it reviewed and initialed by another group member.

What goes onto a notecard?
* Necessary background information on your topic
* Facts or statistics
* Quotations
* Definitions of technical terms
* Evidence that supports your thesis
* Your own notes or ideas related to your topic
Rules of Thumb:
1. Write only one thought, idea, quote, or fact on each notecard.
2. Write only the essential words; abbreviate when possible (except when quoting!)
3. Write in your own words (paraphrase)
4. When paraphrasing someone’s opinion, indicate this fact.
5. Put quotation marks around any material that you copy word-for-word (and be painstakingly accurate with the copying!)
6. Always follow the same format for your note cards (see below).

VERY IMPORTANT INFORMATION ON QUOTING A SOURCE
Quotations should only be used:
* to lend expert authority
* if you are going to analyze the quotation
* when the quoted words are either so uniquely or so concisely stated that your paraphrase will diminish their power
Quotations should only be used:
* to lend expert authority
* if you are going to analyze the quotation
* when the quoted words are either so uniquely or so concisely stated that your paraphrase will diminish their power
Notecard Format
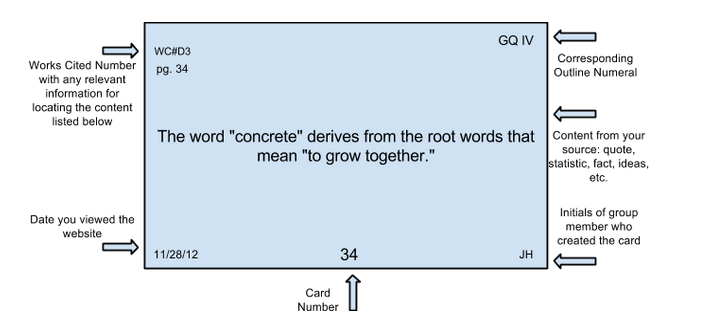
Below is a sample note card with each item labeled. Beneath it is a glossary which describes each item in greater depth.
Glossary
Works Cited: A list of the sources you used in your research, compiled according to the very particular and generally annoying requirements of MLA.
Works Cited Number: As you compile your list of Works Cited sources you will number each source. (This document will be your “working Works Cited page”.) As you use each source to make your notes record which source each note came from by writing the Works Cited Number in the top left corner of the notecard. It will always be written in this format: WC#D3. If there is more specific information about the location of the content you are paraphrasing or quoting, then you will note that information below the Works Cited Number. For example, on above notecard the student noted that the information about the word “concrete” was taken from page 34 of the source.
Date Viewed: Always note the date on which you gathered your information. Websites change. A reader could potentially check your source and find that the information you quoted is no longer where you said it was. Cover yourself by noting the date on which you viewed the site. (This date is also required on your MLA Works Cited document.)
Corresponding Roman Numeral: One of the steps in doing research is making an outline to summarize your findings. A rough outline is like a roadmap for your research. It lays out your plan for where each section of your data will go and what it will contain. Usually, before you begin your detailed research, you write a rough outline. Then, as you gain more information you refine your outline by adding the new information in an organized and logical manner. Each GQ on your outline should be labeled with a Roman numeral (I, II, III, IV, V, VI, and so forth.) When you write a note on a notecard you should know which GQ you are doing research to answer; the GQ will be labeled with a Roman numeral in your outline. Write the Corresponding Roman Numeral at the top left corner of your notecard. As you move ahead with your research you will add more detail to your outline; you may want to add that detail to the top left corner of your card. For example, you may want to write “IV.B” to indicate that the information on this card connects to section B of your the fourth GQ.
Content: This is the information you are paraphrasing or quoting, the statistic or fact you are recording, or the personal idea you are writing down. It does not need to be as short as the example on the notecard above, but it should fit on the notecard (writing on the back of the card is acceptable, but make a note to the reader to turn the card over.) Each card should only contain one main content item. This will allow you to rearrange your information easily during your composition phase. It will also make it much simpler to decide where your note will fit within your outline.
Initials: The creator of the note card must put his or her initials on the bottom right corner of the card. This helps everyone in the group keep track of who took which note. It ensures accountability (nobody wants to sign shoddy work!) and allows for easy reference later on.
Card Number: Number your cards as you complete them so you can keep track of how many you have done, and if you are missing any.

How to conduct your notecard research
As you create your notecards and have them checked off by the IT teachers, you will gradually organize all the information you are gathering into a complete and detailed outline. Follow these steps:
1) Before you begin:
You’ll need to create two important notecards to guide the research of your GQ’s. The first is a Peer Review Checklist card (see examples on IT whiteboards). You will use the criteria on this card to judge your groupmates notecards when you peer review them.The second is a GQ Card for the GQ you are researching. This should contain the Roman numeral from your outline and your guiding question, written large in bold pen. While researching you should keep this card in a prominent place on your desk or table; it is your visual reminder to only write down notes that help you answer your GQ.
* Each time you submit notecards to a teacher or peer for sign-off you will place this GQ Card on top of the stack so the reviewer can also have a visual reminder of your GQ.
1) Organize as you go:
You created a basic working outline in the Bridge to Benchmark 4. Make sure this outline has your SDQ on the top of the page and a Roman numeral assigned to each of your GQs.
As you move on with your research you will find it necessary to further organize your data to make is more accessible and useful. Early on you’ll need to divide each GQ into smaller sections of data. These sections will be labeled on your outline with a capital A, B, C, and so forth. Think of them as parts of your GQ. For example, if I have a GQ that asks: How do natural forms of brain enhancement compare to “unnatural” forms? I can start by creating two sections for logging that data: A. Natural forms, and B. Unnatural forms. (Refer to the example on the Bridge to B4 page) As your research goes deeper you’ll need to organize further, following the general protocols of an outline.
2) Have a groupmate check your work:
As you complete your notecards it is required that one of your group members checks your work for clarity and format. After each card is checked that group member must ask the person who created the card to correct any errors and make any unclear wording more clear. Once the corrections have been made the reviewer must initial the top right corner of the back side of the card. All cards must be reviewed by one group member before any cards can be submitted to IT for sign-off. Take your job as a reviewer seriously; the teacher who signs off on the cards is also signing off on the thoroughness of the review.
3) Collaborate to plug information into your outline:
Before you can be signed off to move forward to each blog, you must update your outline by transferring the appropriate data from your cards into your rough outline (in condensed form.) This requires you to analyze the information you have written on your cards: Which cards hold the main ideas? Which cards hold ideas that are actually details of those main ideas, or support for those main ideas? Outlines abide by a specific hierarchy (or tiered system of ranking); it is your job as the note-taker to determine what information is the most important, and what information is secondary but still important, and where that information should be placed in the hierarchy of your outline. Before your can start a new research IT blog, you must sit down with your group and incorporate all your new data in your evolving outline.
